

EMDAR Contact Management
The EMDAR Contact Board module allows management of EMDAR contacts. A contact is an untracked EM emissions pattern thought to indicate a Tactically Significant Maneuvering Object (TSMO). As the EMDAR system is not directional and becomes less accurate over distance operators will typically spend some time managing contacts before accurate enough information can be obtained to achieve tracking with a narrowband array.
Process Overview
A contact represents the estimated position of a possible TSMO based on an indicative EM emissions patterns on the Waterfall Displays. By selecting the range to the patterns (on one lateral array and one longitudinal array) the range and bearing to this point in space is calculated.
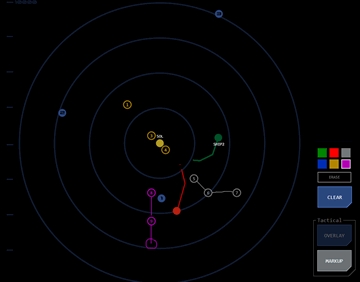 It is unlikely that the TSMO's position will be estimated accurately enough on the first contact for tracking purposes. Multiple contacts will likely need to be created for each target as EM patterns are detected (where a target TSMO maneuvers, for example, thereby temporarily increasing its EM output) to refine its location. To help match contacts with their target, each suspected target is given a designation and each contact associated with that target is also assigned that designation.
On the tactical overlay, each designation has its own color:
Sierra: Silver (grey)
Bravo: Blue
Victor: Violet
Tango: Tan (gold/yellow)
This is particularly useful when multiple TSMO targets are suspected.
The contact board provides data on the range and bearing of each contact at the time of its designation. Until acquired by a narrowband array a contact cannot be tracked. A contact’s estimated location is defined as a particular point in space and the contact board will update the range and bearing to that point based on movement of the vessel, but not on any shift in location of the contact itself.
A contact’s details can be updated at any time, where the contacts position has been refined, where its designation needs to be changed or if the contact is no longer relevant and can be re-used. Each contact has a time indicating the time elapsed since designation or last update.
Once a contact’s EM emissions are strong enough to make tracking possible, the most accurate contact is assigned to a narrowband array. These are a more focussed and directional version of the passive arrays used by the EMDAR system, that can track the movement of an EM source once acquired.
Module Layout
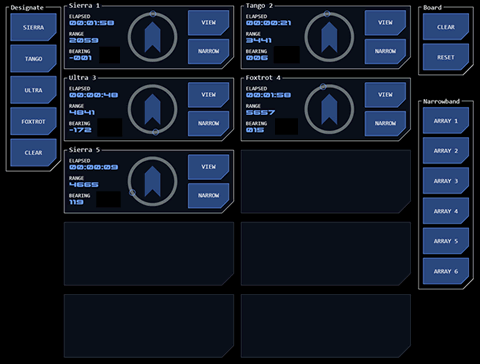 The contact board can display up to ten contacts. This limit is imposed by the computation resources required to manage the relative position of the vessel and contacts.
Operation/Display Modes
The EMDAR Contact Board has two operating modes.
Monitor Mode
This mode displays contacts currently being managed by the EMDAR team without any associated designation or assignment controls. The commanding officer will likely have a contact board in this mode displayed on one of their command consoles, for example.
Operation Mode
This mode allows contacts to be added to the board, updated and assigned to narrowband arrays. In this mode, the contact board works in conjunction with other EMDAR modules including waterfall displays and the EMDAR monitor. An EM pattern is targeted on the waterfall displays, assessed on the EMDAR Monitor and then added to the contact board.
Contact Layout
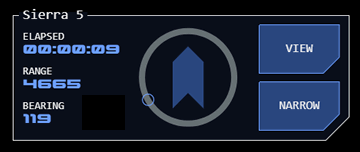 Each contact is displayed underneath it’s designation, which includes a system-assigned designation number. This number is the primary means of identifying a contact, as the designation may change at any time. The number is unique to the current mission phase and is not re-used (until the contact board is reset – see below).
Each contact displays the relative range and bearing to the source EM’s location in space at the time of the contact’s creation or update. The range in bearing is updated to reflect movement of the vessel but not the movement of the source EM pattern (as there is nothing for the system to track).
A timer indicates how long it has been since a contact was created or updated. The timer will change colour to alert and then alarm status after a predefined time to prompt the operator to update the contact.
Operating Procedures
Adding (Designating) a Contact
Using the EMDAR waterfall displays, select ranges on one of the longitudinal arrays and one of the lateral arrays (this selection will usually be based on the location of EM patterns of interest).
Selecting these ranges will update the EMDAR monitor with a bearing and directional range and will display the EM profile for that location.
- Select the designation for the contact. If this is the first contact, choose any designation. For subsequent contacts that are thought to represent the same target, choose the same designation. If a new target is suspected, choose a different designation.
- On the contacts board, tap an empty contact slot. The contact will be added to the board and the elapsed timer will start.
Updating a Contact
Updating a contact is required when its designation changes or where it is preferable to refine the contact's location rather than create a new contact (where the contact is about to be assigned to a narrowband array, for example).
- Within the contact that is to be updated, click the VIEW button. This will:
- Transfer the contact’s location to the EMDAR Monitor which will change colour to indicate it is displaying details from a contact.
- Change the bearing indicator for that contact to a matching colour to indicate the link with the EMDAR Monitor.
- Display the contact’s current settings in the Designate button group.
- To change the designation or EM Band:
- Select the new settings in the Designate button group (both or just one can be updated as required)
- Click UPDATE in the contact. The button will indicate the update has been completed.
- To update the location of the source EM pattern:
- Click the EM pattern’s new location on the lateral and longitudinal array.
- The EMDAR Monitor and EM Profile will update to reflect the new location
- Click UPDATE on the contact. The button will indicate the update has been completed.
- Steps 2 and 3 can be performed separately or as part of the same procedure.
Deleting a Contact
Contacts can be removed from the board when it is no longer necessary to manage a contact (because the source EM pattern has disappeared from the waterfall display, for example).
- Click VIEW on the contact that is to be removed
- Click CLEAR at the bottom of the Designate button group.
- Click UPDATE on the contact.
- Confirm the deletion. The contact will be removed from the group.
The deleted contact’s designation number will not be re-used unless the board is reset, to avoid confusion.
Clearing or Resetting the Board
All contacts can be removed from the board at once with the Board button group.
- To remove all contacts without resetting designation numbers:
- Click the CLEAR button.
- Confirm the clearance. All contacts will be removed. Designation numbers will not be reallocated.
- To remove all contacts and reset designation numbers:
- Click the RESET button.
- Confirm the reset. All contacts will be removed and designation numbers will be reallocated starting from 1.
Allocating a Contact to a Narrowband Array
Where a contact’s location is considered accurate enough it becomes possible to direct a narrowband array to acquire and track the contact source.
- Click NARROW on the contact that is to be allocated. The button will indicate that the contact is to be assigned.
- Select an unassigned narrowband array from the Narrow button group. The selected button will change to indicate the array is in use.
- The circular bearing indicator in the contact will change colour to indicate that the contact is being tracked by a narrowband array.
- If the acquisition process fails, an error state will be indicated and the contact and array button will reset to their normal states.
If a contact is tracked it will remain on the contact board, but its range and bearing will be updated automatically as long as it remains tracked.
Tracked Contact Display
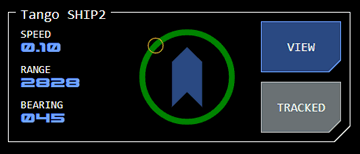 A tracked contact (or "track") is identified by a green bearing track.on the central visualisation and the display of the TRACKED button with active status.
The contact's designation number is replaced by a unique code.
The elapsed time is replaced by an estimate of the TSMO's speed.
Tracked Contacts and Designation
Designations are used differently for tracks. All tracks appear as green on the tactical overlay and are labelled with the contact's number. Instead, the designation now indicates the target's tactical posture:
Sierra: Unkown posture
Bravo: Friendly posture
Tango: Threat posture
Victor: Neutral posture
When created a track retains the designation originally assigned to its contact, but this should be changed to the appropriate designation.
To release the designation from a track, use the same procedure as if you were deleting a contact (see above). The first time you do this with a contact, it will remove the designation. If you use the deletion procedure again on a track that does not have a designation, the track will be deleted.
It is possible to add a designation back to a contact (or change an existing designation) using the same procedure as for contacts.
There may be reasons why a tactical officer (or the conn) wishes to retain the tracks' designation:
- To ensure continuity of identification across the track creation process;
- If the designation is being used to identify the TSMO's posture - such as "friendly" (bravo) or "threat" (tango);
- Where the tactical officer wishes to ensure the contact remains identifiable if the track is lost.
Releasing or Losing a Track
A track may be released manually by tapping the contact's TRACKED button. A confirmation dialog will ask for confirmation of the release.
A track is lost if the TSMO goes out of EMDAR range or where an AO comes between the vessel and the TSMO.
If a release or loss occurs, the track will revert to a contact. The contact's position will be updated with the last tracked position of the TSMO.


